Now you can easily turn your website visitors into your CRM Leads with Joforce. You can easily create as many web forms as you need in your Joforce and use it on your website, and you can get all your Lead info right inside your Joforce. Incorporating information about your website visitors or users into your CRM system.
Create/edit of webform in Joforce #
With built-in options to create web forms, you can easily create and use web forms on your website and capture all your potential Leads info inside Joforce. To create a webform,
- Click on the Left SideBar→ Settings → Navigate to the Automation section → Webforms → Add Webform on the top right corner
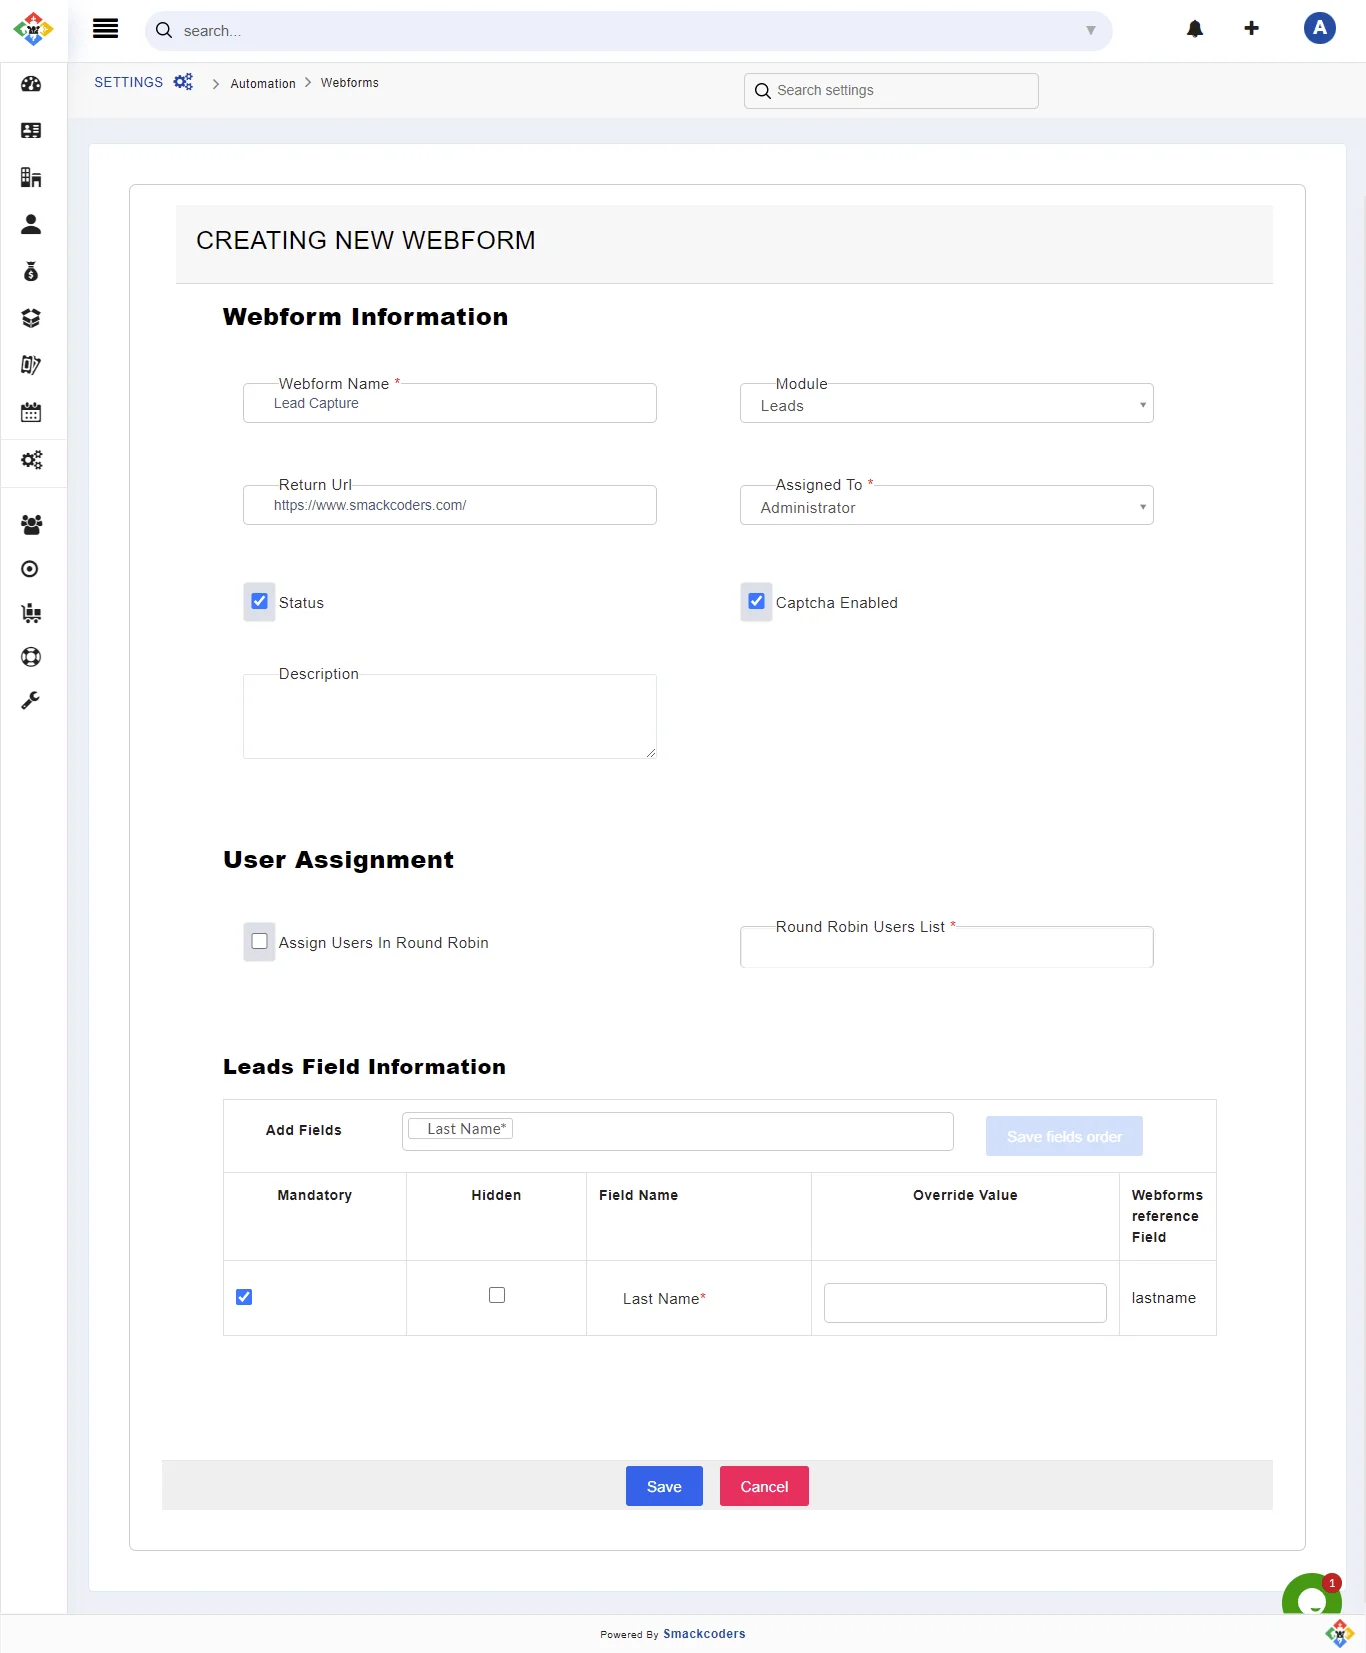
- In Creating a new Web Form overlay, add the following information
- Webform Information
- Webform Name – Enter a unique name for your webform
- Module – Choose the module on which the records are to be created. i.e. It represents the module on which the captured webform info is created as a record.
- Return URL – Give the URL to which your users need to be navigated after successfully submitting the webforms.
- Assigned To – Select a user or group to whom you want to assign the records.
- Status – Enable the checkbox to make your Web form active. If you no longer need to use the web form, then you can disable the checkbox.
- Captcha Enabled – Click on the checkbox to prevent Joforce from entering unnecessary/ spam Leads.
- Description – Add some description related to your web form
- User Assignment – It lets you automatically assign Leads to your Joforce users one after the other based on Round Robin.
- Assign Users In Round Robin – Enable the checkbox to assign the newly created records to your users.
- Round Robin User List – Choose the list of users you need to assign the records to.
- Field Information – Add the fields that you need to include in your Webform. These are the fields that are displayed in a web form to get information from your Leads.
- Add Fields – Choose the appropriate module fields that you need to add to your web form. You can also reorder the fields by simply dragging and dropping the fields within the input box. Once added and reordered the fields, click on Save fields order.
- Mandatory – Enable the checkbox to make any of the web form fields mandatory.
- Hidden – To make any of your fields hidden i.e. not shown to users, enable the checkbox
- Field Name – It displays the set of fields you’ve chosen.
- Override Value – The value entered by your users will get overridden by the value you enter here.
- Webforms Reference Field – This will be helpful while mapping with other CMS.
- Add Fields – Choose the appropriate module fields that you need to add to your web form. You can also reorder the fields by simply dragging and dropping the fields within the input box. Once added and reordered the fields, click on Save fields order.
- After entering all the necessary information, click on Save. Once the webform is saved the Public Id and Post URL are automatically populated. You can get the values from the List and Detail view of the Webform.
To edit the webform,
- Click on the desired web form, you need to change
- Click on Edit, make the necessary changes
- Finally, hit Save.
Use of web form to capture Leads #
After successfully creating the Webform in Joforce, you can use it on your websites. To use the web forms,
- Navigate to the detail view of the web form, Click on Show Form
- Copy the HTML code and use it on your website.
- Now your web form is ready to capture Leads from your website to Joforce.
Integrating existing webforms with Joforce webforms #
With Joforce you can easily integrate all your existing web forms with Joforce web forms. Establish a connection between your existing web form and the Vtiger webform, to integrate it.
- Include the Public Id in the {input} tag and Post URL in {form} tag
- Change the name of the fields as per the Webforms reference fields.
You can get all this information from the detailed view of the web form.
Eg : Existing Webform

