It lets you keep your Google contacts and calendar sync with Joforce Contacts and Calendar. Joforce helps you to maintain all your contacts and calendar info in one place.
Configure your Google Account #
You can configure the google settings in 2 different ways.
- Click on the Left SideBar → Settings → My Preferences → Extensions → Google
- Else navigate to the Contacts or Calendar module. Click on the Lists drop-down at the top. Navigate to the Extensions section, and click on the Google option
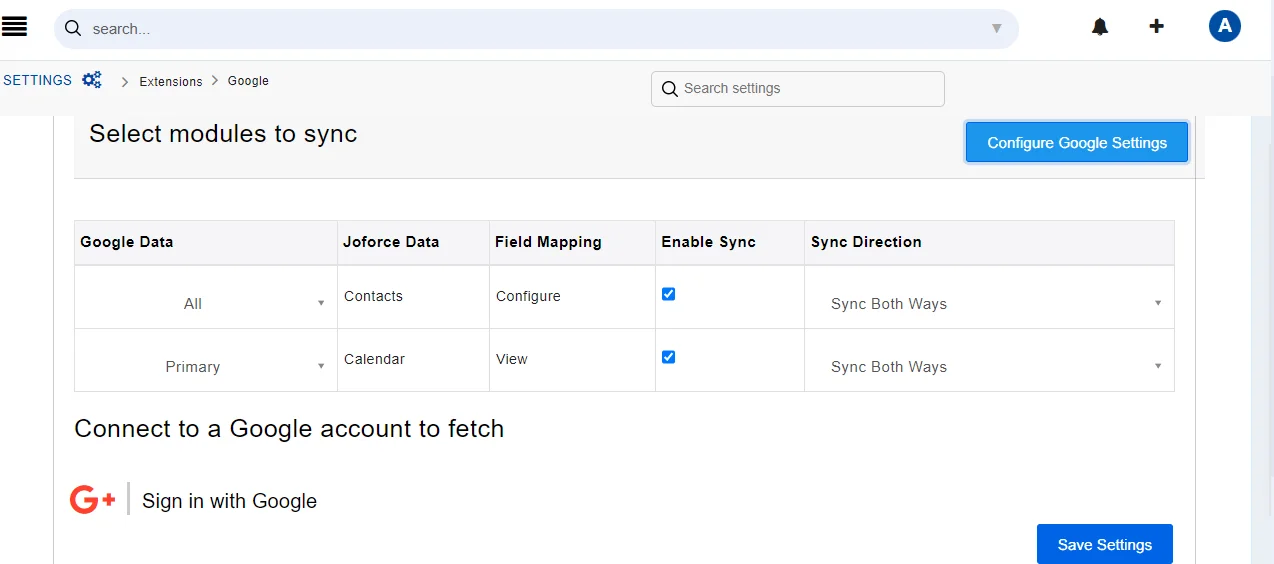
Once done, you will be navigated to the Select modules to sync section.
Now you need to configure your Google account for secure sync of google contacts and calendar events,
Click on the Configure Google Settings in the top right corner
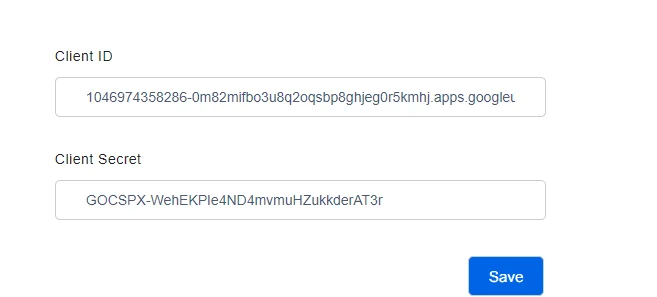
- Client ID
- Client Secret in Joforce
Once configured, you and your users can connect your own Google Account with Joforce.
Get your Client ID and Secret #
- Log in to your developer console
- Click on the projects menu at the top. It displays the list of all projects that you already have. Choose one among them and create a new one.
- Your new project is created, now click on Credential from the left-side menu
- Navigate to the OAuth consent screen, Provide the email address, and product name and click on Save
- Now navigate to the Credential tab → Create Credentials → choose OAuth client Id from the drop-down
- Choose your web application from the application type
- Enter your domain in the Authorized redirect URls and click on Create
- Copy and paste your Client Id and Secret into Joforce
Connect your google account #
- Connect your Joforce CRM with your Google Account by clicking on the Sign in with Google button
- To enable sync between your Google account Joforce CRM, click on the checkbox Enable Sync
- Choose the sync type, Joforce CRM offers 3 options
- Sync Both Ways
- Sync from Joforce to Google
- Sync from Google to Joforce
- Field Mapping
- For Calendar – All the Joforce CRM fields are mapped with the Google fields appropriately. You can also view the mapping by clicking on the View below the Field Mapping.
- For Contacts – All the Standard fields are mapped by default, if you’re using any custom fields, you can configure the fields by clicking on the Configure below the Field Mapping.
- Click on Add Custom Mapping, and choose the appropriate value (i.e. Email or phone or URL, or any other custom field)
- You can also delete the custom mapping field, by clicking on the Trash icon on the right edge of the desired field.
- Once done, click on Save.
- Finally, hit Save Settings.


