Joforce renders a set of fields for all the modules by default. However, you can also customize it based on your requirements. With the Module Layout and Field Editor, you can create, edit and reorder any fields. You can navigate to this Module Layouts & Fields in two different ways,
- Settings(only for Admin Users)a. Click on the Left SideBar→ Settings → Navigate to the Module Management section → Module Layouts & fields.b. Choose the desired module you need to change the fields from the drop-down.
- Modulea. Navigate to the desired module Eg: Leadsb. Click on More option in the top right corner → Choose Leads Fields & Layouts
Once completed your changes click on Save Layout.
Creating a new custom block for a Module #
Beside the default block offered by Joforce, you can also create a custom block for your Module. To add a new block,
- Click on the Add Block in the left corner.
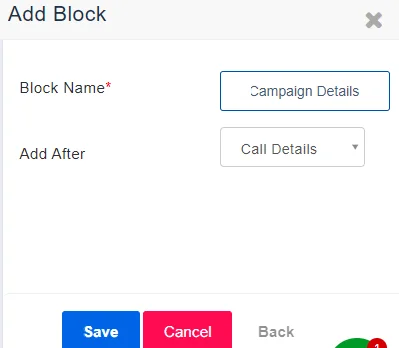
- A Add Block pop-up prompts,
- Provide the Block Name
- Choose the appropriate block from the Add After drop-down to place the new block next to the selected block.
- Click on Save. Your new block will be added.
Adding custom fields to your Module #
Joforce enables you to create any no. of custom fields for any block apart from the default fields of the module. To add fields,
- Navigate to the desired block, Click on the Add Custom Field in the top right of the block or scroll down to the bottom and click on Add Field.
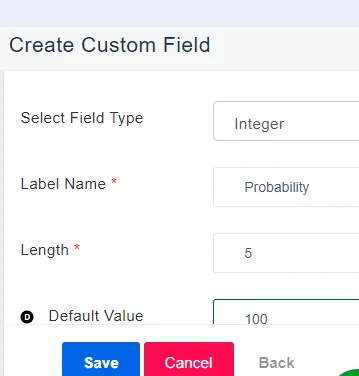
- In the Create Custom Field popup,
- Choose the type of field for the Select Field Type drop-down, Joforce provides you with 15 different types of fields
- Add a name to your Label
- Add length
- Provide a default value for the field in the Default Value column
- Add the field properties
- Once done, click on Save.
Field Types
| Field Type | Description | Information to be added |
| Text | To add text value | Length – Size of the text field |
| Decimal | To add decimal values | Length – Size of the field |
| Integer | To add integer values | Length – Size of the field |
| Percent | To represent percentage values | Length- |
| Currency | To denote currency values | Length – Field Size |
| Date | To add date | – |
| To add email address | – | |
| Phone | To add phone numbers | – |
| Picklist | To add dropdown values | Picklist values – Add the picklist values |
| URL | To add website URL | – |
| Checkbox | To add checkbox
Enable – True Disable – False |
– |
| Text Area | To add longer text | – |
| Multi-Select Combo Box | Add picklist values to select multiple values | Picklist values – Add the values |
| Skype | To add Skype Address | – |
| Time | To specify Time | – |
You can view the new custom created and now click Save Layout.
Editing a field for a particular module #
You can edit any default Joforce field or any other custom field, by clicking on the edit icon that appears beside the appropriate field on Hover.
For default fields of Joforce,
- You can edit the Field name.
- Enable/ disable the already existing field property. But can’t enable any new property
For Custom fields
- You can edit any values at any time based on your needs.
Once done with your changes, click on Save.
Deleting a field in Joforce #
If you no longer need any custom field created by you, you can delete it at any time. Or you can also hide them and use them later. However, you can’t delete or hide any of the default fields of Joforce. To delete a field,
- Hover the mouse on the desired field.
- Click on the Trash icon and in the alert message that pops out, click on Delete – I don’t need the data in this field
Finally click on Save Layout.
To make a field hidden #
With the built-in hidden option, you can hide any custom field when you don’t need them. You can also reactivate it at any time. However, you can’t hide any of the default fields of Joforce.
To hide any field
- Click on the Edit icon of the desired field
- Select No in the Show Field value
- Then click on Save.
To unhide any Field,
- Click on the View Hidden Field in the top right of the desired block
- The List of hidden fields is displayed here, enabling the checkbox of the field to need to activate.
- Once done click on Reactivate.
Finally, hit Save Layout.
Enable/ disable the available field properties #
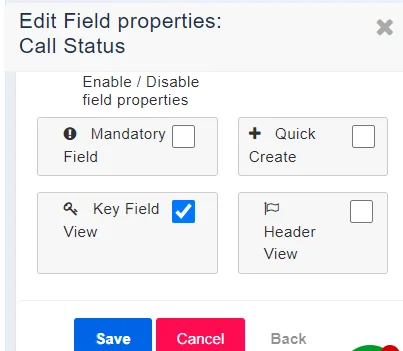
Joforce offers 5 field properties. They are
- Mandatory Field – To make the field mandatory to fill the details
- Quick Create – To make the field available in the quick create popup
- Key Field View – To make the field available in the Key Fields section of the detail view of the record
- Header View – To make them available on the Header section of the record.
- Mass Edit – To make the field available during the Mass edit of record fields.
You can enable/ disable any field property, either by
- Clicking on the Edit icon
- Click on the desired field property beside the appropriate field.
Once done, hit Save Layout.
Rearranging the fields in Joforce #
Joforce renders the flexibility to rearrange the field arrangements to suit your requirements.
- Just drag the field and drop it in the desired place.
- You can move the field left, right, up and down positions
- Finally, hit Save Layout.
Expand/ hide the blocks in the detail view of the module #
This feature lets you expand or hide(collapse) the block in the detail view of the record. To enable this,
- Navigate to the desired block.
- Enable the Collapse Block option
Relationship between the different Module Field #
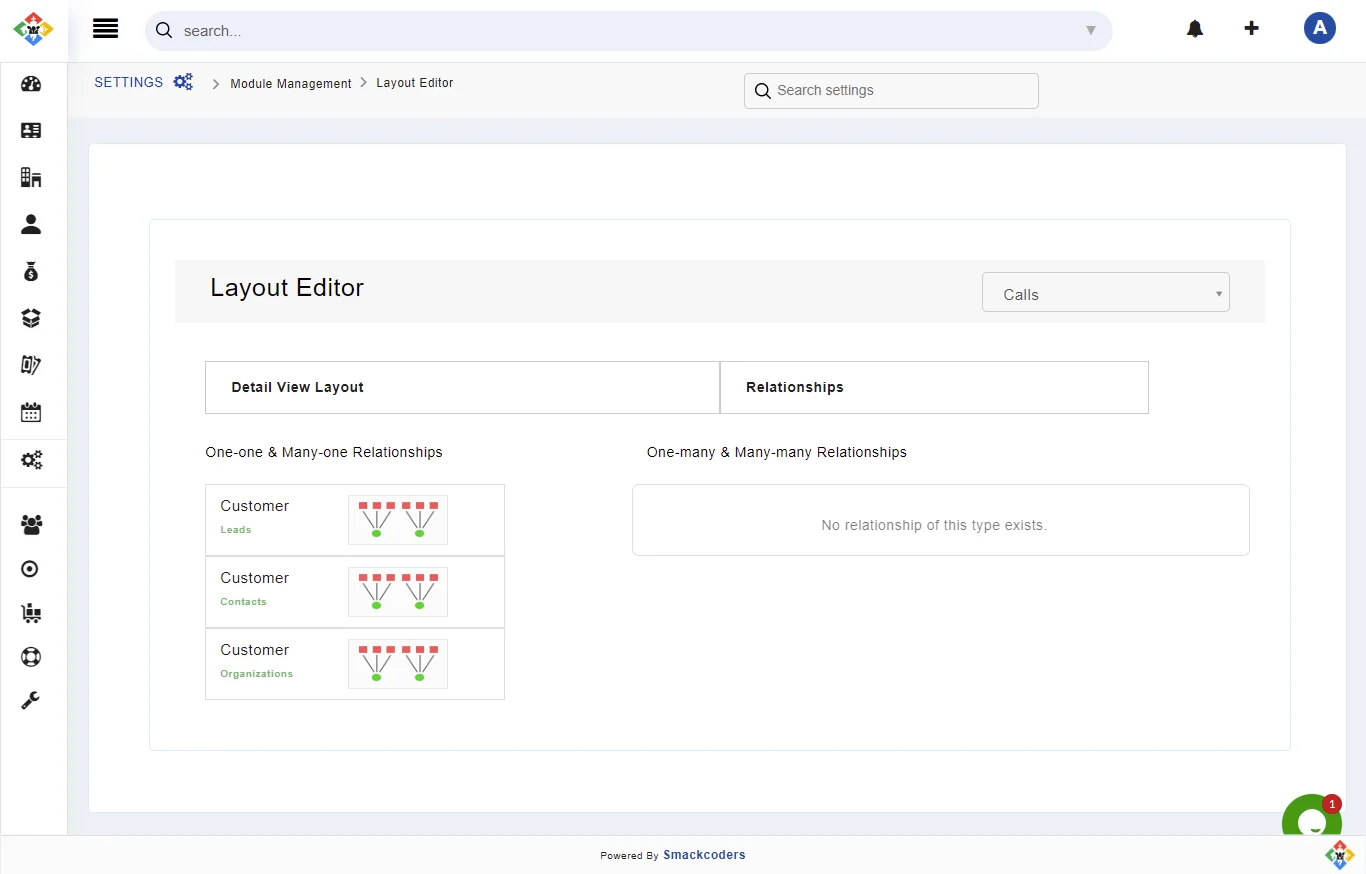
Relationship explains the link between two different modules and their records. To view the relationship between modules, navigate to the Relationships section.
Joforce offers 4 default relationships,
- One-one
- It represents the one-way relationship.
- Records of Primary and Related Modules are uniquely related.
- Eg: A Contact can be associated with only one Reports module and vice versa.
- Many-one
- Many records of Primary Module are related to only one record of the Related Module
- One-many
- Records of Primary Module are related with many records of Related Module
- Many-many
- Both the Primary and Related Module have multiple records related to each other.
You can reorder, enable or disable the relationships between modules. However, this is applicable only to the One-many and Many-many relationship.
- To reorder – Drag and drop the desired relations
- To Disable – Click on the X icon. The disabled relationship is labeled as hidden and you can also enable them
- To enable the hidden – Scroll down to the select hidden module box. Choose the relation and it will be added
Finally click on Save.


